Chest Freezer Cold Plunge: The Honest Safety Guide
A chest freezer cold plunge costs $400-$700, but it puts a person in water inside an electrical appliance. The real shock risk, how to reduce it, and when to skip it.
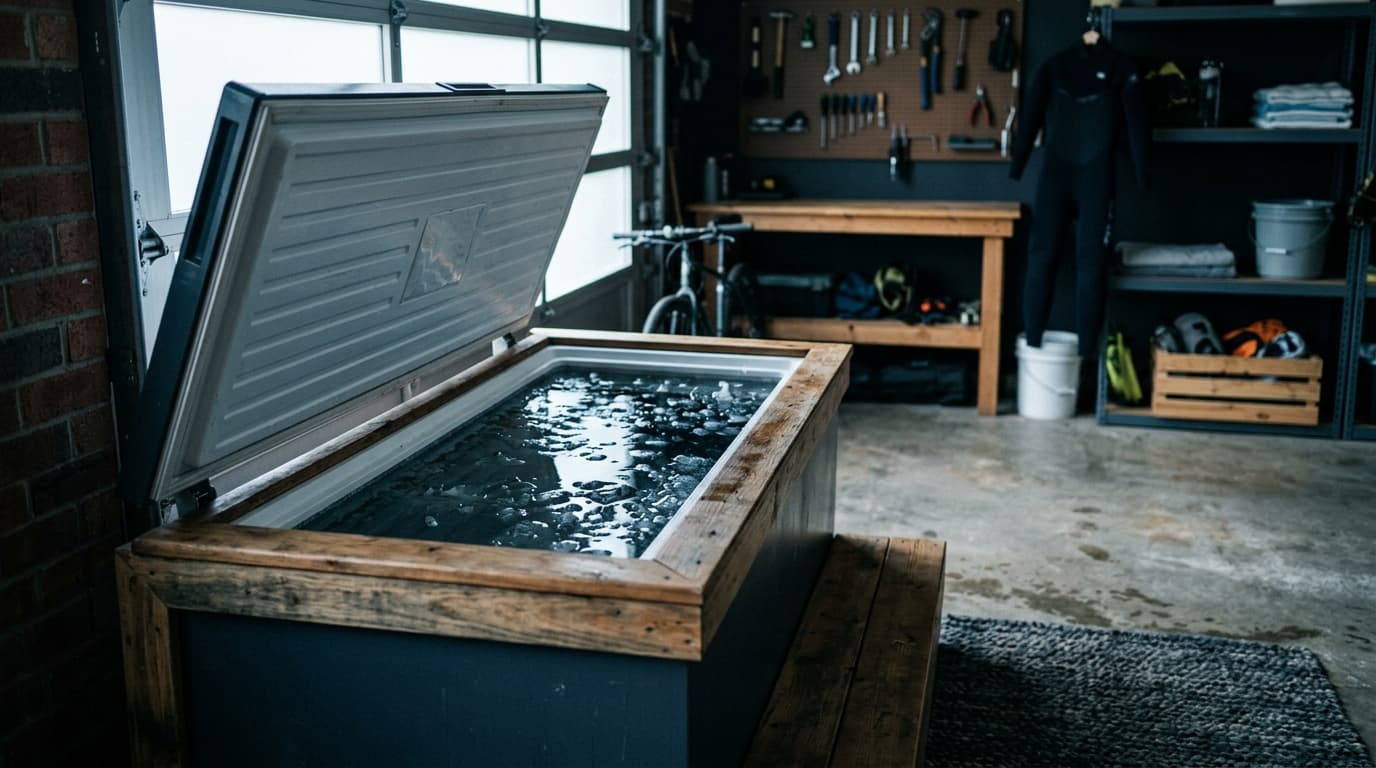
Installation
Quick answer: A chest freezer conversion is the cheapest way to get water that stays near freezing, usually $400-$700 all in. The catch is that you are putting water and a person inside an electrical appliance never built for either, and the shock risk is real. Done with a GFCI, a sealed liner, and the freezer unplugged before you get in, people run them for years. Done without those steps, it is dangerous.
Best for
Handy DIYers on a tight budget who will not skip the GFCI, the liner, or the unplug-before-entry rule.
Wrong fit
Renters, anyone who wants plug-and-play, and anyone who will not follow every electrical step every single session.
Tradeoff
The lowest cost for water that stays cold all the time, against an appliance modified past its design with a shock risk you manage by hand every time you use it.
Quick Answer
A chest freezer cold plunge is the cheapest way to get water that stays near freezing without buying ice, usually $400 to $700 all in once you add a temperature controller and an electrician-installed GFCI outlet. That is real money saved against a chiller-equipped plunge, which runs $3,000 to $10,000 or more.
Here is the part the YouTube build videos rush past. You are putting water and your own body inside a sealed electrical appliance that was designed to sit dry in a garage. If the liner fails and water reaches the compressor wiring, and there is no ground-fault protection, the whole tub can become energized while you are standing in it. That failure mode is not a leak you mop up. It is an electrocution risk. People run these safely for years, but only because they respect the electrical rules, not despite ignoring them.
The idea is simple. A chest freezer is a well-insulated box with a compressor that can pull water down to freezing and hold it there. You seal the inside so it holds water instead of frozen food, wire in a temperature controller so it stops before the water turns to ice, and you have a cold plunge that costs a fraction of a commercial unit.
The appeal is honest: cold water on demand and no daily ice runs. A lot of people land here first, and for many it is a reasonable place to start before spending real money. For the cheap alternative with no electrical modification at all, compare it against a stock tank cold plunge.
The real cost versus a real chiller
Setup
Realistic all-in cost
What you actually get
Chest freezer conversion
$400-$700 (estimate)
Cold water on demand, DIY electrical, manual safety routine
Stock tank plus ice
$150-$400 (estimate)
Cheapest entry, no electrical, but you buy ice constantly
Ice Barrel plus a Penguin-style chiller
~$2,500-$3,000 (estimate)
Purpose-built tub, a chiller rated for water, real support
Treat every number as an estimate. Freezer prices swing with size and whether you buy used, controllers run $35 to $60, and a GFCI outlet installed by an electrician is commonly $150 to $300. The point is not the exact figure. It is that the freezer saves you a few thousand dollars and hands you the electrical and safety work in return.
The safety problem: water plus an electrical appliance
This is the section that matters more than the cost. Read it before you buy anything.
Why the shock risk is real
A chest freezer was engineered for one job: keep a sealed, dry cavity cold. Its wiring, its compressor, and its interior were never rated to sit against water, let alone a grounded human body in that water. When you convert one, you are relying on a liner and sealant to keep water away from electrical components that are inches from where you sit.
If that barrier fails, and liners do fail, water can reach wiring. Without protection, current can travel through the water and through you. Cold-water immersion already triggers a gasp reflex and raises your heart rate. Adding an electrical fault to that situation is how these builds cause serious injury and death. This is not a scare tactic. It is the specific reason the mitigations below are not optional.
GFCI is the single most important thing
A ground-fault circuit interrupter (GFCI) monitors the current flowing out and back on a circuit. If it detects even a small imbalance, the kind caused by current leaking through water or a person, it cuts power in a fraction of a second. It is the one device standing between a liner failure and a lethal shock.
Have a licensed electrician install a dedicated GFCI-protected outlet for the freezer. Do not run it off a shared garage circuit, an extension cord, or a portable adapter. Test the GFCI on a schedule, because a GFCI that has failed silently gives you no protection and no warning. If you take one thing from this guide, it is this: no GFCI, no plunge. For how this fits the wider picture, see the cold plunge safety guide.
The liner and sealing the seams
Most safe builds use a food-grade or pond-grade liner as a full waterproof barrier between the water and the freezer interior, plus marine or aquarium-safe sealant on the seams. The liner is not a nice-to-have. It is the primary barrier keeping water off the electrical components. A thin painter's plastic sheet is not this. Budget for a real liner and inspect it for wear before every session, because a pinhole today is a bigger tear next month.
Unplug before you get in
The habit that experienced DIY owners repeat most: disconnect power before entering the water, every time. Many run the freezer on a timer or a smart plug so it chills the water on a schedule and is switched off during use. Some physically unplug it. The routine removes the electrical hazard during the one window when you are actually in the water. It only works if you never skip it, which is exactly why this build is wrong for anyone who will treat "unplug first" as optional on a cold, tired morning.
Condensation, mold, and the compressor
Two slower problems. First, running a freezer full of water in a warm space produces heavy condensation on the outside and around the lid, which invites mold and can pool near the electrical connections. Ventilate the space and keep connections dry and elevated. Second, freezers are built to run in cycles, not to fight a warm room continuously. Constant running shortens compressor life and, without a temperature controller, the water will keep dropping until it freezes solid and can crack the liner or the shell.
When this is a bad idea
Straight answer, because you deserve one before you spend a weekend on this.
You rent, or the space is shared. You cannot add a dedicated GFCI circuit you do not control, and you should not improvise around that.
You will not commit to the routine. If unplugging before entry and inspecting the liner sounds like something you would skip when rushed, this build is not for you. The safety depends entirely on the human doing the same steps every time.
You want it to just work. There is no warranty, no support line, and every failure is yours to diagnose. If that sounds exhausting rather than fun, buy a sealed unit.
You plunge alone and no one knows. Cold immersion carries its own risks around the cold-shock response regardless of the tub. Combine that with a DIY electrical setup and the case for having someone nearby gets stronger. Read when not to cold plunge before you start any cold routine.
If two or more of those describe you, the honest recommendation is to start with a stock tank and bagged ice while you decide, then step up to a purpose-built tub with a chiller. You lose the "always cold" convenience and gain a setup with no electrical risk to manage.
If you still want to build one
For the handy person who will respect every step, here is the realistic shape of a safer build, not a how-to:
Start with a clean, working chest freezer sized to sit in comfortably.
Line the interior fully with a food-grade or pond-grade liner and seal every seam with a water-safe sealant.
Wire in a temperature controller so the compressor stops well before the water freezes, typically holding water in the 45 to 55°F (7 to 13°C) range for most people.
Have a licensed electrician install a dedicated GFCI-protected outlet. This is the line item people cut, and it is the one that keeps you alive.
Add a timer or smart plug so power is off during use, and build the unplug-before-entry habit from day one.
Plan for water care, because still water goes bad. See cold plunge water maintenance for ozone, UV, and change-frequency by method.
None of this replaces advice from a licensed electrician for your specific space. When in doubt, pay for an hour of their time. It is the cheapest insurance in the whole project.
Chest freezer versus the alternatives
If the electrical routine is the dealbreaker, you have two clean exits. A stock tank cold plunge with ice carries no electrical risk, at the cost of buying ice. A purpose-built plunge with a chiller hands you sealed electrics, a warranty, and filtration for a lot more money. The chest freezer sits in the middle: cheap like the stock tank, always-cold like the chiller, and it asks you to personally manage the safety gap between them.
It can be, but only with a licensed-electrician-installed GFCI outlet, a full waterproof liner, and a strict habit of disconnecting power before you get in. The risk is that water reaching the freezer's wiring can energize the tub while you are in it. The GFCI is what cuts power before that becomes fatal. Without those steps, it is genuinely dangerous, and this is one of the few cold plunge decisions where cutting a corner can kill you.
How much does a chest freezer cold plunge cost?
Most builds land around $400 to $700 all in, treating that as an estimate. That covers a freezer at roughly $200 to $400, a temperature controller at $35 to $60, a liner and sealant, and a GFCI outlet installed by an electrician at $150 to $300. It is far cheaper than a chiller-equipped plunge at $3,000 or more, and the savings are real. What you trade for them is the electrical work and a safety routine you own forever.
Do I really need a GFCI outlet?
Yes. It is the single most important part of the build. A GFCI detects current leaking through water or a person and cuts power in a fraction of a second, which is the exact protection a converted appliance around water needs. Do not run the freezer off an extension cord, a shared circuit, or a portable adapter. Have an electrician install a dedicated GFCI-protected outlet, and test it regularly.
Will the freezer keep the water from freezing?
Only if you add a temperature controller. A freezer left running will keep pulling the water colder until it freezes solid, which can crack the liner or the shell. A controller stops the compressor at your set temperature, holding the water in a usable range like 45 to 55°F (7 to 13°C). It also spares the compressor from running nonstop.
Should I just buy a real cold plunge instead?
If you want it to work out of the box, carry a warranty, and remove the electrical risk you would otherwise manage yourself, yes. A sealed unit or an Ice Barrel plus a chiller hands you support and safety by design. The chest freezer makes sense for a handy person on a budget who enjoys the build and will never skip the safety steps. If that is not you, spend the money.
Methodology
These guides are built from manufacturer documentation, public specifications, primary research where health claims matter, and repeated buyer questions that show up in real ownership and installation decisions.
Manufacturer responses can clarify pricing bands, warranty terms, support footprint, or common mistakes. They do not move a page up the shortlist on their own.
Health and safety pages are written conservatively. When the safer answer is to slow down, get clearance, or skip the heat, that is the answer we give.